Sunday, December 30, 2012

Oh, My(o)!!


Typical of life in the world of prosthetics...just when I think that upper extremity is not my cup of tea and does not have quite the "wow factor" that making legs does...I get to put on my myoelectric arm!!  This is like creating a robot (and I tried that when I was in 3rd grade and it was completely unsuccessful).  My myo arm, on the other hand, worked beautifully.  It was like watching living art.  Okay, I know I am being a little dramatic here, but it was really amazing - and gave me the same rush as seeing someone walk in a leg that I have made.

I had a model patient (not to be confused with a patient model - which he was also).  He has used myoelectric arms in the past (this obviously helped because he was well schooled in isolating his muscle groups and using the right ones to open and close the hand), but he does not wear one now - he prefers his hook.  I have to brag on myself for a moment because he did say that this was the best total fitting, total contact socket he had ever had.  Hooray, self-congratulatory pats on the back...all of that :)  I am allowed to brag about the best fitting comment because after wearing the arm for about half an hour and moving around, it began to fit a little too well.  Meaning, we could not get the thing off.  This is not a joke.  We were pouring powder down into the socket, using lotion - it would not come off.  I began sweating (bad day to wear a cashmere sweater) and was completely panicked that this poor man was going to have to have my socket cut off his arm.  I was worried that it was hurting him and I have to be honest, the student in me was a little worried about the future of my grade if we did not solve this problem.  My professor eventually spotted my panicked stricken face and saw three of us tugging on the arm and came up with a magic solution.  Air!!  Myoelectric sockets have holes drilled into the bottom in order to pull the patient into them (because they are supposed to fit so snugly), so he placed a tube into the hole and blew air in it so it popped off.  Phew.  I was so relieved.  So, the obvious good new is that the socket did come off my patient, the bad news is that when it got stuck it was just in the time period in which we were fitting the sockets - I still had to present my arm to the class for critique!  I was not really ecstatic about the idea of putting the arm back on my patient, but he was a good sport and figured if we had to resort to the air to get it off again, it was not the end of the world.  The school must pay these patient models a decent amount of money ;)

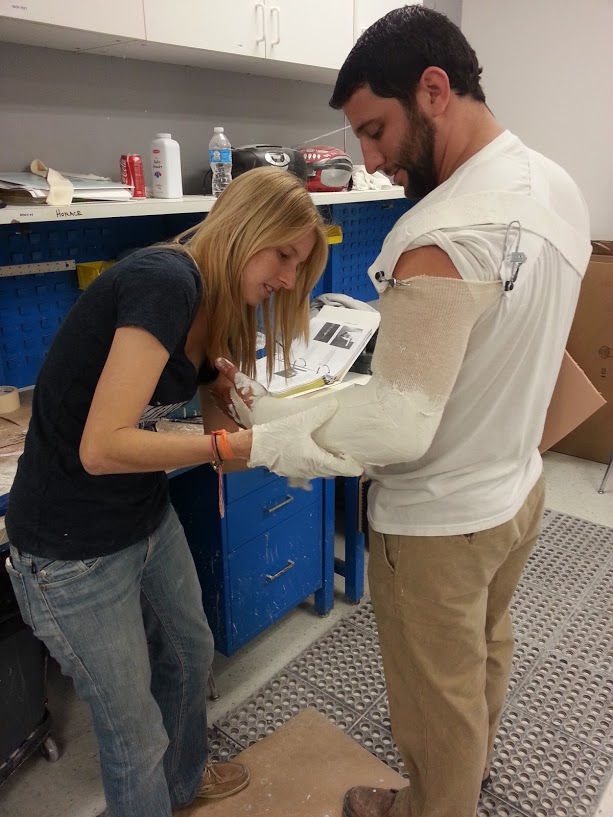
This is me shaking my patient's hand...my face does not look quite so polite because this was before we had given him a lot of practice and this was more of a hand crushing than a hand shaking.  After wearing the arm for 10 minutes, he was picking up his coffee in a plastic cup and easily drinking it and putting it back down.  He was able to control the speed at which he opened and closed the hand and the amount of force he used when grasping an object.  Like I said, pretty amazing.  It was just a really exciting day - moreso than I had imagined.  I could not believe that by making this socket and implanting two little sensors and screwing on a hand - fairly simple tasks - the end result would be so awe inspiring.  Granted, I did not create the actual hand and the fancy technology to go with it, I just helped implement it, but that was enough to end my semester on a really high note.

Yes, you read correctly...I said end the semester.  This was officially the last project of the semester and it was actually my highest scoring project yet!  I guess that is the whole goal, right?  Continue to improve - makes sense that I should be getting the best grades when I have the most "experience."  

So, we rushed through upper extremity...got a crash course and now we will be rigorously tested to see what knowledge we have retained.  Next on the agenda is two full days of finals - I believe 8 tests in all.  We will be tested on everything from the entire course - all the way back to transtibial (which is a little scary because I am not sure I remember a thing)!  After the two days of testing...provided they go well...I graduate.  Then they send me out into the real world.  Okay, thankfully for me, I am coming back to do the orthotics program in the Spring so I get to avoid the real world for at least another few months :)  Next time I post, it should be about graduation - so if I do not resurface, it is because the finals were too overwhelming and I decided to move to the Caribbean and be a bar tender.  Maybe if I get tired of studying I will watch Tom Cruise in Cocktail and work on my bottle spinning moves...


Sunday, December 16, 2012

Getting Hooked on Upper Extremity

Well, when we started working on arms, all I could think was - I am running a "leg only" clinic!!  I just keep getting comfortable with one part of the body and having the tables turned on me and the feeling of helplessness makes me want to run back to what I know...which is a whole 13 weeks of lower extremities :)

Onto the important stuff - the fitting of my arm prosthesis.  My biggest fear in these fittings became my biggest reality...my socket would not go on my patient's arm.  Not even with lotion and coaxing.  I thought I was going to have to bag this project and chalk it up to a rookie mistake and hope for a better result next time.  Oh, no no no, not in prosthetic school...we are "failing forward" and there is no chalking anything up and turning the page.  There is only figuring it out in the following four hours!!  

So, that is what I did.  I heated up my socket, I flared it out, I trimmed it down and I magically got it on my patient.  Phew, one thing down.  It was not easy and not quick, but it had to happen in order to keep moving forward with my fitting.  I was so relieved when my patient was able to get this arm on that I was not too worried about operating the hook and working out the harness fit.  

The harness is easily adjustable so that was no big deal, the hook and cable and all of that was another source of drama and stress for the day.  I was cutting my cable over and over to get it the right length...repositioning my hook and adding rubber bands.  Long story short - it took a LOT of work, but at the end of the four hour fitting, my patient was able to wear the prosthesis and fully operate the hook to complete all the tasks required by my professor's check-out standards.  I was then able to chalk this one up to a successful project...and that made me very happy and very relieved.  Maybe upper extremity isn't so awful :)


As always, the day is never short and our reward for completing a project is the introduction to our next project.  In upper extremity, our next project is to create a myoelectric arm.  This was the second cast and mold that I worked on the day after finishing my arm with the hook.  The myoelectric arm is the one that is controlled by sensors on the muscles of forearm of the patient - these sensors are used to open or close or rotate a hand/hook.  

So, our afternoon was spent learning the ins and outs of myoelectrics that we will be fitting our patients with in the morning.  We learned the computer programs that go with the sensors and how to use the sensors and find the exact right muscle spots to get the most out of the sensors.  We actually got to put them on our own arms and hold the myoelectric hands in our hands and operate them - opening and closing - to see what our patients would be experiencing.  Per usual, I love the real life application that we were given in getting to use the sensors.  It is much harder than you think to control only one muscle group at a time.  In order for the sensors to work best, you have to flex with one group to close the hand and extend an other muscle group to open the hand - working on this control and fine tuning it to open slowly or close halfway is really difficult.  Most of the time, patients are sent home with sensors and computer programs that include games in order to get their muscles used to functioning the right way so the will be able to get the most out of their future myoelectric device.  

I was staring at this suitcase full of hands all during the lecture...it was a little creepy so I thought I would share :)

Tomorrow we fit our myoelectric sockets and then hopefully get our patients working on the sensors and able to make these arms fully functional!!

Monday, December 10, 2012

Fun with Foam!

One day...two arms.  Probably the toughest task given to us the whole semester.  Starting a new body part is tough because I am always clueless when it comes to modifying - as I should be, this is school.  We typically get a day or two to get the modifications done before moving on to completing whatever limb we are making.  This is not the case when there are only 2 weeks left until graduation!!  We casted in the morning, modified in the afternoon and completed the entire arm by the end of the day.  It was insane.  And awful :)

I forgot to take a picture of just the plaster mold, but let's be honest...we have seen about a hundred of those over the last few months.  We were told the modifications for this arm should only take about half an hour - again, let's be honest...it took me a solid two hours.  That is okay, all in the name of learning!!  After modifying the mold, it was time to do the vacuum plastic - this time we used a more flexible plastic in order to make it easier for our patients to get their arms into the socket.  This made for a quick and easy melting and vacuum forming process.  Thank goodness for something that was quick and easy at this point in the day!

After getting the plastic socket made came the craziest thing I think we have done yet - and that is saying a lot considering all the things we have made this semester.  I need to make the crazy scale relative - it was not the craziest thing as far as most intense or greatest impact or any of that...it was the craziest thing as far as in the world of science and materials.  Because these residual limbs are so short and they need to made into a full length arm to match the sound side limb, we have to foam material over the socket to add the length of the prosthesis.  So, I took plastic, made a funnel cover and then mixed two liquids together in a cup and poured it into the funnel and it literally became foam.  It was amazing.  When I poured it in it only came up about one third of the way of the funnel and then with the power and magic of modern science, it started to become foam and slowly rose out and over the top of the plastic funnel.  I felt like I was in the 6th grade making an erupting volcano for the science fair...I was like, when do we get to do this part again!? After about 15 minutes, the foam is set and ready to go. Then it was just about sanding it and trimming it down to make it into the shape of an arm...or somewhat into the shape of an arm.  Regardless, I do not feel like I am doing the foam part justice, but trust me, it was the highlight of the day.

After getting the foam right, I fiberglassed over the whole thing (to provide some rigidity and strength since we are not laminating these) and then began to attach all of the components.  When I said I was making this from scratch, I was not kidding.  I put on the wrist unit, I was attaching straps with rivets (okay, confession, I could have sewed the straps, but I found ones that were already done in the bin at school), I screwed the hook in and I even made the whole cable by myself.  Stringing wire through the housing, melting Teflon, using wire cutters - pretty tough stuff :)  After getting everything hooked to the arm, I attached the triceps cuff and the shoulder harness and the arm was done and ready to go.  And so was I!!  This was so much to get done in one day that I really never thought it could happen.  It is crazy to look at the first picture right after doing the vacuumed plastic and then to think a few hours (an eternity) later, it is a prosthetic arm all ready to go...with a working hook and everything!  What a day!!  And just when I thought it was over and I could go home and get the plaster and fiberglass out of my hair and off my shoes...we were told we had to pull our second arm socket.  That is right - I forgot to mention that when we casted our patients in the morning, we actually casted two patients each!!  They are really cramming this upper extremity stuff in at the last minute!  So, because we took two casts on two different patients...we then have to make two different sockets.  The point of this is that one socket is going to be the hook socket and for the other socket, we are going to make a myoelectric arm (one that is operated by sensors attached to the muscles in the arm).

Alas, just when I was patting myself on the back (with my freshly created arm), I had to smooth up my second arm and get it pulled and ready by the end of the day.  Luckily, a longer trans-radial amputation is much easier to modify so this one did only actually take about half an hour.  I was able to smooth it out and get the socket pulled before they turned the lights out on us for the day.  We have a couple of more days to get the second socket cut out and smoothed before the myoelectric fittings...phew.

As always, my biggest concern for the prosthetic fitting (for my first arm - with the hook) is that it will not even go onto the limb.  As I mentioned in the last blog, upper extremity is all about exact fit so without that, I might be in trouble.  I know I can get the hook working and the harnessing attached correctly and comfortably so I am focusing on getting my patient into the socket and then going from there.  Here is to another successful fitting, happy patient and high marks in critique!

Sunday, December 9, 2012

Movin' on Up

We have closed the chapter on legs and have moved above the waist to upper extremities...aka, arms!  Upper extremity prosthetics is a whole different ballgame - when making legs, it is all about function (comfort plays a big role, of course, but you want to get the person up and walking).  In upper extremity prosthetics, it is more of form over function.  The majority of people with upper limb deficiencies have already adapted their lives to accommodate for whatever their limb difference might be, and most choose not to even wear a prosthesis.  Upper extremity has not come as far as lower extremity, so with hooks being one of the best options, many users choose to wear nothing instead.  If someone chooses to wear an arm prosthesis, a lot of times, it is for cosmetic reasons - this is where you have to get the form of the prosthetic device just right.

So, like the beginning of every other new topic, we used ourselves and each other as patients.  We casted as though we were casting someone with a wrist disarticulation - essentially, someone who has just lost only their hand.  It is strange, but this casting was a little trickier to get just right...moreso than the legs were the first time.  We also had to use splinting methods, as opposed to wrapping, and that made it hard to capture the volume and all of the anatomical landmarks.  A lot of prosthetic arms are self-suspending so it is really important to get the fit just perfect.  A lot of them also involve wearing a harness (as you see in the pictures) and that is a second form of suspension if it does not suspend on its own via the skin or a liner.  Horace made a lovely cast of my arm and created a comfortable socket for me to wear around school.  It probably helped that I was a model patient :)


It is always interesting to be put in the patient's shoes - such a different perspective in the casting.  As a practitioner, I am constantly feeling rushed and like the plaster is setting off and getting hard too quickly.  I am hurrying to get it all done before it is too late, but as a patient, it seems as though you have to hold this position forever before the plaster turns into the hard cast.  Trying not to move to help out your practitioner is a little stressful...something important for me to remember in the future!


Horace was an equally great patient - if only his arms were not so darn big :)  I made it easy on him, he only had to make the tiniest little cast ever.  I was struggling to get my hands around both of the splits and hold the whole thing in place on his arm.  There are all of the rules about getting the elbow in and making sure it can bend and going over epicondyles...I felt as though I did a pretty decent job for my first ever arm casting, but like I said, it was surprisingly more difficult than I had imagined.


The last half of the day, we were fitting each other for modified arm prostheses.  I mentioned that a lot of them involve wearing a harness and this hook is the very reason why.  It is attached to a cable system that is activated to open and close by elevating or rotating your shoulders.  The harness system allows for pulling to occur and the cable to pull back on the hook and open or close it.  Getting to wear this was like when we put on the walking boot and got to experience what walking on a prosthetic foot feels like.  I love when the school is able to make this really applicable and give me a chance to feel first hand (in a small way), what it is like to have a limb difference.  I know that when you live with this harness and hook system it becomes second nature and patients do not have to even think about operating them, but we were attempting to do normal things (unbutton your jeans, pick up a water bottle, get keys out of a purse) and it was tough!!  We also had to be able to get ourselves in and out of the harness with one arm on our own...this involves some contouring and acrobatics for sure!!

All in all, our first day in upper extremity went really well - I learned a lot and it was super jam packed, but this is something I really know very little about (and have seen very little in the field) so I am glad to be learning it and glad to be getting some hands on experience.  We will cast our patients and make them the same type of hook and harness device - from scratch - and hopefully all of the pieces and parts come together to make a working arm!

Thursday, December 6, 2012

There's No Time...There's Never Any Time!!

School is winding down and it is insane!!  This has been one of, if not, the longest weeks of the semester...we have done upper extremity all week and it has been an exhausting whirlwind!!  I have to give a research presentation tomorrow and am in the middle of creating my PowerPoint for it, but I thought I would post a few fun pictures from the last few weeks...just so you do not think I have quit school and taken up a career elsewhere :)

Representing for the Symbionic leg on a patient visit day - we actually did not even plan this, but I thought it looked adorable!

No forewarning class picture at the end of a super long day of patient visits and critiques...I wish I would have known, I would have put on mascara or something :)

Me, Horace and Erin during a photo shoot for Cal State's website about the O&P program...natural models.

Friday, November 30, 2012

Take Initiative...

This is a quick fundraising and awareness raising plug.  I could give you all of the facts about people with limb loss and their emotional well-being and mental health, but I highly recommend that you watch this presentation and learn these statistics for yourself.

Tonight I am attending a fundraiser specifically aimed at trying to not just raise money, but to raise awareness and aid for the mental health and care of people living with limb loss.  It is a truly great cause and one that hopefully begins to gain more momentum as more people become aware of how this really impacts this community.


If you are inspired and feel led to donate - we are trying to reach a goal of $200k and have currently raised $170k thus far - any amount will be used and appreciated.  Here is the link for the donation page...

Sunday, November 25, 2012

A Farewell to Legs

The end is near!  I mean, like it is done - my school career in leg making has come to a close.  Insane.  I am not sure how it went by so quickly...I blinked and went from my first cast to laminating this last leg. After getting the lamination done, I trimmed my socket out and I was so excited about the way it looked!  The inner liner came out just as it was supposed to and having a pattern on the socket really makes it much cooler in my opinion.  When you are spending hours with this leg, getting to put a little bit of creativity and fun into it puts a smile on your face.  Everything about making a leg is about following a pattern, following a specific body or bone or alignment - getting to jazz it up and make it fun is more about you as a practitioner, and typically, most specifically about your patient.  As I mentioned earlier, these legs were about us because we were the ones taking them home, but hopefully in the future, my patients and I see eye to eye on all of the fun stuff we can do with their sockets :)

I put a different pattern on the inside of the leg and was actually pleasantly surprised by how cool it came out as far as looks goes, but I did manage to miss a few spots with the resin and therefore it was just some patches of soft fabric on the inside as opposed to all hard and glossy and smooth like it was supposed to be.  Oops.  Time for prosthetic problem solving - a little adjustment to the trimlines and a little extra fiberglass and resin and I was good to go.  Rookie mistake - I can guarantee you I will not "under-resin" ever again!!  What would school be if not for making mistakes and learning from them?  

After I got the socket smoothed and sanded down and dropped the outer hard layer down so the inner flexible liner would have room to actually be flexible, I was able to gunk on the components.  This part is always a little stressful to me because it has to be in the right angle and flexed and all of that, it just seems so final.  The flip side of that being that it IS final...and that means you are at the end of the leg making stage - attaching the components is just tightening a few screws!  (My professors would kill me for saying that, clearly there is much more that goes into it.)


Now it becomes one of those cooking shows where they magically have everything already prepared before starting and they just keep throwing ingredients in and pulling out beautifully cooked dishes.  I did a little gunking and fiberglassing and voila - here is my completed leg!  Everything attached and everything working and now I just need a patient to make it walk back and forth.  I always feel like a leg that stands up on its own is a good sign - at least I know it is all level to begin with.  So, this is all ready and good to go for Paul's arrival - I just need him to bring his shoes and a good attitude and hopefully some extra energy to do some walking.  Critiques for these last projects are supposed to be much shorter and much easier than the previous ones because with transfemoral sockets, it is mainly the socket fit that causes the problems, not as much the alignment.  And, according to our professors, will all of our alignment practice this semester (all 12 weeks thus far), we were not going to focus too much on that during critique.  And since we had all been able to make at least two sockets for these current patients, in an ideal world, our sockets should have been fitting pretty nicely.

The key phrase in that last statement being "ideal world."  Despite my addiction of the silicone pad and taking off a lot of plaster before creating this second socket, my socket was still a little too big on Paul.  It was not crazy, a simple pad made it much better, but I was surprised it was still big with the amount of material that I had added and taken off after the test socket.  Paul is also a little on the fleshy side and tends to go nuts with his diet (McDonalds for breakfast before the last fitting, chocolate cake for midnight snack this time around) and so it is hard to predict what his body is going to do in response to his diet.  Too much salt and he is swollen, one skipped meal and he is dropping down in size.  This is a common issue with a lot of patients so definitely something I will see again...good thing I love a challenge :)  So, here I am on critique day, proudly displaying my finished leg and dressed to impress.  My critique went well, Paul walked around and overall, the fit, like I said, was not horrible.  It is so crazy that this was my last big project of school and that I am going to be graduating in four weeks!!  We do a couple of upper extremity things in the next couple of weeks, but nothing really major like these legs we have been making.  It is all coming to an end quickly.  

Because of the finality of the project, it was a big picture day at school - they even had professional photographers in capturing it all.  Everyone was feeling very accomplished and very pleased with themselves and it was fun to have everyone feeling relaxed and proud and taking a moment to celebrate our accomplishments so far.


Sunday, November 18, 2012

The End is Near


Well, after the initial fitting and adding the silicone padding and tweaking my check socket a little bit, I filled it with plaster and set about creating a new mold to base my final socket on.  After getting the new mold as smooth as possible, I pulled a really flexible material over it to create an inner liner for the final socket.  It is thin and easy to manipulate and goes inside the final socket.  This provides more freedom and definitely more comfort, mainly at the top of the socket where it meets the skin.  It enables me to lower the trim lines of the hard outer socket and provides the patient with the same amount of support, but with more flexibility.  We treated this inner liner the same as any other socket made out of plastic and had to cut it off the mold once it cooled.  I left the flexible inner liner on the socket because the next step was to laminate the socket to create a hard and durable outer socket.  We have only done this one other time this semester and I feel like that was ages ago so it seemed a little bit intimidating!!  We were also encouraged to use fun fabrics in our laminations this time because it is our final big project and the one that most people take home with them as a little souvenir.  

You will be shocked to find out that I chose to use an Indian themed fabric print for my socket :)  It was total coincidence that this was one of the fabrics that happened to be at school and I actually really thought it was cool looking and different.  Laminating is always a crazy time, you only have a certain number of minutes before the resin you pour into the bag over the socket gets hard and there is a lot to remember.  I took the original mold with the flexible inner liner over it and then there was a long set-up process involved to get it to the point of lamination.  I used a different fabric print on my first layer, so when you look down into the socket, it is also patterned.  Then we alternated between nylon and fiberglass (for strength and support) until we had 6 layers of nylon and 3 layers of fiberglass before adding the final outer layer of pattern.  Once it is set up and ready to go, mix the resin and then pull a bag down over the socket.  You pour the resin into the bag using a funnel and draw it down into the bag with a string or your hands...once it covers the entire socket, you just have to sit back and wait and let it get hot and then set off and get hard.  Seems fairly straight forward, right??


The room is always a little nuts and a lot crowded when everyone is trying to get their socket laminated at the same time before the end of the day deadline...this always makes things a little more stressful for me, but I have to remember that in real life, I will not be competing for space with 17 other students!  Almost everyone managed to get their sockets laminated and done by the end of the day - always a huge relief for me when I make the deadline...makes going into the next day so much easier and less stressful.  

Respirators are a must when you are laminating - fumes and whatnot...I think it certainly does not hurt to protect all of my insides!  And like I have mentioned before, they just look so dang good on me :)  Now that the lamination is done and complete, I just had to wait for it to set off and then the next step in the process is to trim out the socket and smooth it down and get my flexible inner liner out and smoothed as well.  Once those two things are done, it is time to gunk and attach my knee and feet and hope my patient can walk in this leg!!  If he cannot...at least it looks really cool and gives off an air of peacefulness and harmony.  I figured a few meditating gods on the socket could only help me in having a good patient visit on the next day!  

Wednesday, November 14, 2012

Playing Catch Up

I know, I know, I am very behind on posting.  I am sure a lot of people could not even sleep this past weekend because they had no idea how my leg fitting with Paul went last week.  Never fear, I am here to start catching you up!

This is what the training room looks like on the morning of a patient appointment.  My station was all set up with my finished leg waiting and ready to go!  Paul came in and he did not seem like he was much in the mood for being there, but he was a good sport and let me and my partner try our legs on him multiple times in the four hour allotted time.  The first fitting is just putting the leg on, seeing what needs to be changed, taking the leg off, changing what you can, and putting it back on again to see if it is fitting any better.  At first it seemed as if my leg was not going to even fit on Paul - he was having a hard time getting down into it, but after a little tweaking and some lubricant, he was able to get all the way into the socket comfortably.  Phew.  I was able to get good suction (meaning the leg was not going to fall off of him when he started walking) and he said that the socket felt really good. The only major issue I had was that there was a big gap one the side and back on the socket.  It is just where a lot of fleshy tissue can go so it may have had tissue in it when I casted him and depending on the way he was standing during the fitting, it might have moved around...regardless, it was too big in that area and needed to be fixed.  The quick fix is to put silicone in the socket to see how much filler you need and to let it mold to the patient's body in order to be able to create a better fitting socket later.

This is what my giant clump of silicone looked like in my check socket.  This seemed to do the trick and I was able to get Paul walking back and forth (bending the knee and everything) for the last part of the appointment.  We are actually going to create a second socket for these patients - we have just been making test sockets and throwing them away after one time, but because this is our last big project, we are going to really make the whole leg and try and make it look somewhat professional.  The way to go about making the second socket is to fill this plastic check socket with plaster and create a whole new mold.  The beauty of making all of your modifications and putting the silicone in this socket is that when you pour plastic and pull out a new mold, ideally, it should be exactly the mold you are trying to achieve and not need any more modifications.  We will take the second mold and use that to create a flexible inner liner (for comfort) and then a more stable and finished socket.  This is the part where we get to be creative and use fun fabrics and make cool legs.  I cannot wait!!

I will post another update tomorrow and by the weekend, I should be caught up.  In real life (not in this catch up world on the blog), we are fitting our patients tomorrow with our finished legs and will have a critique on Monday.  By Monday, I will be up to speed on here so we can all experience the critique in real time together :)

Monday, November 12, 2012

The Best Vet

In honor of Veteran's Day (no school today) - I wanted to share a video about the only veteran I have really gotten to know on a personal level.  I met Dan at the camp I volunteered for this summer.  It is easy to become a person who feels little or no effects of the war when you do not really know anyone who is fighting in it.  That was me.  I had no friends or siblings or anyone really close to me who was fighting in this war...I only knew what I saw on TV or read in the papers.  Until I got to camp...and I met Dan.  I am including a video that tells Dan's whole story so I will not go into the details myself...but Dan is amazing.  His attitude towards life, his willingness to push himself and never give up - he is the kind of person who would inspire anyone.  He fought for his country and I know he would go back and do it again, even knowing the outcome.  (The video would not embed for some reason, but I am asking you to please click on the link - it is so worth it.)

http://www.komonews.com/news/local/Lewis-McChord-soldier-loses-legs---but-not-his-spirit-178718291.html?tab=video&c=y

*This video was shot in August - Dan is already accomplishing major goals - he just completed the Marine Corps Marathon last month.

I did manage to get one video of Dan to embed from YouTube and it is the perfect one for Veteran's Day...we should all be so thankful to these men and women.


Friday, November 9, 2012

Reunited and it Feels So Good

No post from last night because I was spending the evening with my camp co-counselor, Lacey!!  She was in town for the night and we had a slumber party!!  So so so much fun.  Loved getting to see her...cannot wait to go back to camp!!

Wednesday, November 7, 2012

1001 Ways to Bend a Leg

This was my view at 7am this morning.  The time change may make staying at school until it is dark a bit tough, but it makes my apartment light up at 6am (making sleeping past that almost impossible), but making it easier to get to school earlier and work on my leg.  I was pleased to see that the plastics room looked exactly as I had left it 14 hours previously - my leg in position on the vacuum ready to go.  All I had to do was turn the oven on and wait for it to reach 360 degrees.  (This happens much slower when you can see the oven digitally counting up the degrees).  The slow warm up was probably a good thing for me, gave me a chance to wake up and get ready for a long day of work.  Well, apparently it did not give me long enough to wake up fully - I messed up my first pull of plastic.  Cue the sad violin music.  It was slightly disappointing - mainly because I was geared up and beat the crowd to the plastics room and was ready to get a head start on the day.  This is a really big leg and I took too long pulling the plastic down over the leg.  The plastic began to harden before I could get vacuum suction around the bottom edge (really the top of the leg) sitting down on the wooden wheel.  It is a very sad realization when you have suffered through burning metal on your hands and sculpting this piece of plastic over your mold to find out that you have to redo it.

Alas, I kept a positive attitude and put a new piece of plastic in the oven and began the melting process again.  No coffee needed for this girl, messing up your plastic mold will quickly wake you up and really realign your focus.  There was no way the plastic was getting the best of me today - I had a leg to finish by the end of the day and I was going to finish it!!  Notice in the picture that the end of the residual limb is about the same size in circumference as my head :)
After getting the plastic done right (yes, the second time was the charm), it meant cutting and trimming and grinding.  The cast saw is now my friend and I use it with great confidence.  The sanders and grinders, while we have yet to reach friendship status, we are definitely good acquaintances and I do not mind visiting them every now and then ;)  It is not even that I am intimidated or bothered by the grinding anymore, it is just that I am not a huge fan of doing it.  It is a necessary evil and because of that I am happy to spend half an hour eating plastic dust, but of all the things that come with making legs, this is on the lower end of the totem pole for me.  This picture is what I call "grinding success!"  I used to take the pretty socket and get really excited about how nice it looked...take it to my desk and admire it.  Now I just go ahead and rough up the bottom (it has to be done before the gunking process) and do not leave the grinding room until there is no more grinding to be done.  It does not look that pretty, but the edges feel fabulously smooth and my valve looks and works perfectly.  Grinding is the step before aligning and gunking - I managed to get this much done before noon...time was on my side today.

After lunch, I spent some quality time putting all of my components together.  Although I did not get a fancy microprocessor knee for my patient like I was hoping, I did go ahead and use another Ossur knee we had at the school.  What can I say?  I am brand loyal :)  I actually think I picked a great knee for my patient, he does very very little walking and I think a fancy knee would have been too much for him and he would not have used it to its full potential.  I used an Ossur foot that I have never used before so I am excited to see it in action.  Using these fancier knees (we used really basic ones on the last leg) makes the leg look so much cooler and much more like the prostheses you see out in the real world.  That was exciting for me.

I aligned, I gunked and I fiberglassed.  I then reattached my knee and foot and the result is this beautiful limb you see here before you.  Is that not a nice looking leg?  It is going to be even nicer looking in a week when we make an inner liner for it and laminate the socket - there will be no grinding marks or messy stuff at the bottom.  I am still working on a fun pattern to put on it...I selfishly keep looking for one that pleases me and not really considering what my patient might enjoy.  Hmmm, I might need to factor that in...

It is just that I picture this sitting on my mantle...he will wear it for 15 minutes for critique and move back to his real prosthesis.  I think that allows me some artistic freedom when picking out the fabric pattern to use.  Besides...real mean love pink, right??

Today was a great day - I worked hard, I was very productive and I accomplished the set goal of having a completed leg by the end of the day.  I was even able to get out of school a couple of hours early (totally worth going in early this morning for).  I have a huge pile of school work to do tonight and have been plugging away at it since I got home - the blog is my break for the moment.  Tomorrow we have our patient fittings and, per usual, there is always the fear that my patient will not get into the socket.  I am hoping my beginner's luck does not run out by the morning and I am able to get Paul up and walking - you just never know which way a fitting is going to go.

Did I mention that my favorite part of making trans femoral legs is that it is really cool to see the knee bend?  I do not know why this amazes me so much, but I just love that I have created a leg that moves!!


Tuesday, November 6, 2012

Flying Solo

This was my view for the last 8 hours...watching this plaster go through various stages - I believe this was around 11am.  Because this is our last big project and they have really stressed that we should be doing these things on our own (and because I know that my hand skills are not thought of as being amongst the top in the class), I was determined to get through this modification on my own.  I was refusing to ask for help, only asking for guidance confirmation when I was at the endpoint and ready to pull my check socket.  I will admit, the first 3 or 4 hours looked pretty dicey.  I took my lunch break moreso out of wanting to get away from the mold than hunger.  Sitting at lunch I was really questioning if I was going to be able to do this.  I kept thinking to myself, I know all of the steps and what is supposed to be done, but getting it all correct on this mold is proving to be really trying.  There is no guessing or hoping you are right when making a socket - your measurements have to be on, your reliefs (for tendons and muscles and bones) have to be in the right places...otherwise the work you have done for the past 8 hours will be for nothing.  Without getting most of this stuff right, it will take about two minutes for my patient to tell me that this socket is not comfortable and there will be no way he can walk in it.

Ahhhh, progression :)  This was about 4pm...finally able to start smoothing the plaster out and feeling pretty good about the result of the long day.  I got all of my measurements down to where they should be, I put in plaster reliefs and built shelves and flared out walls.  If the picture in the manual is what I am supposed to be going for, I have a winner of a socket for sure!  In all reality, this literally did take all day and it was exhausting.  My back is hurting from hunching over this...my hands are completely dried out from being in plaster...and my clothes were so filthy that I took a towel from school to cover the seat in the car on the way home.  I was not sure how the day was going to go.  I can be honest and say I was not really looking forward to it.  I brought my headphones and put on music and just really focused on getting the leg finished.  We have a few hours tomorrow afternoon to work on our legs, but by the end of the day, it is supposed to be completed - knees and feet attached and ready to go.  We are putting these on our patients on Thursday morning.  It is shocking to me that I am supposed to be making four or five of these a day when I start working in a clinic!  There were people that were done completely - test socket pulled and all components attached before lunch...so I guess the expectation is not too high ;)

Ta da!!  Here is my finished leg - ready and waiting to go outside of the plastics room.  I could not believe that it was finally done and ready to make the check socket!!  And then I got into the plastics room and tried to put my mold on the vacuum, only to discover that my pipe was way too long.  Huge bummer.  The only upside to this was that I had to put it in this device and use a hack saw to cut a few inches off the pipe.  I call this an upside because I have never really used a hack saw before and it was kind of cool!  I felt very handy and kind of wanted to go cut more stuff!  This being said, because of the cutting of the pipe, I was not able to get my plastic check socket pulled today.  I put my leg back in the vacuum jig and set everything up and plan on getting to school half an hour early tomorrow so I can get it pulled before lecture starts in the morning.  I want to be able to go into the afternoon with the plastic done so I can start modifying and trimming that down and attaching all of my parts.  Waiting in line in the plastics room can take over an hour of your day and I do not want to spend most of my afternoon doing that.

All in all, I felt today was hugely successful.  I am beyond proud of myself for getting down to business and pushing myself to really do these modifications all on my own.  As I have mentioned numerous times, the thrill of making a leg has yet to wear off for me, but really putting all of the time and sole effort into this leg just makes it that much sweeter.  I wanted to run a victory lap around the school building at the end of the day today!!  I have yet to keep a socket or take home a leg when I am done with it (mainly because we have to tear it apart to put the components back at school), but I think this socket will be one that adorns my mantle for a while.  Such a great reminder for me today...I CAN do this!!

Sidenote, this time change makes spending all day at school feel even longer...it is tough trying to stay motivated to work when it is dark outside!!


Monday, November 5, 2012

The Last Leg

Today we began our last lower limb project.  Pretty hard to believe.  Granted, this is a two week project so we are not out of the trans femoral woods yet, but hard to believe that I spent the morning casting my last leg as a student.  And what a leg it was!!  Let me tell you!!  I could have easily taken up residence in my cast when it was done :)


You are looking at four hours of hard work laying on the floor of the treatment room.  These are the four casts that were made today by me and my partner, Michelle.  They look haphazardly discarded, but I can assure you they were placed on the floor with love.  We are instructed to finish casting and immediately focus on getting our patients dressed and cleaned up and walked to their car before we even start admiring our own work.  If you look around the room at the end of the patient appointments, it is just casts strewn about.

My patient today, I shall call him Paul - nice guy, not really interested in spending a lot of time at the school (which makes it tough on those of us who do not work up to the speed at which he prefers), and like most of the other men with amputations I have met this semester (and yes, I am generalizing) - a little inappropriate at times.  I do not mind an inappropriate joke or two on the occasion, but they are a little tougher to politely laugh at when you have your hand shoved in precarious places on the person making the jokes.  Needless to say, Paul and I plodded along and we managed to get through the morning.  My first cast turned out to be better than my second cast and I was able to get it filled before having to go to lecture in the afternoon.

Since this is our last big project of the year, we are being set free on our own - the instructors have told us they will be offering very little assistance, reminding us that we should know what we are doing by now and will be out in the "real world" in a matter of weeks.  Sounds like a good opportunity for a lot of the infamous "failing forward" if you ask me.

I am excited about this project because we get to spend some time on it and actually produce an entire leg - (finish it by laminating it) as opposed to just creating the plastic test sockets that we have mostly done.  Apparently this is the time to get creative and we can use fabric patterns to create fun socket designs - its is all free reign at this point.  We are allowed to use whatever components we can get our hands on (once again, I am counting on Ossur to pull through for me) and we are supposed to create a leg all on our own.  Seems a little out of reach for me at the moment, but it always seems out of reach when I am looking a 15 pounds of plaster that does not really resemble a leg at all.

Tomorrow is a full day (we are talking the entire 9 hours) of modifying.  I am planning on going in a little early - I have no clue how long this is going to take me (I am assuming longer than 9 hours) and I would rather have a surprise early afternoon than have them turn the lights out on me at the end of the work day.  We are doing the same modifications on this leg as we did on the last leg, but like I said, this time with no help.  I think this is going to be a struggle, but I am feeling really focused now - I have gotten a second wind in regards to school...this whole 6 week countdown has rejuvenated me and I want to go out with a really great leg (and also a cool one with a fun pattern, but I am trying to keep my priorities straight and focus on getting a great fitting socket first and foremost).

Pray that the plaster is kind to me tomorrow and that I am able to transport this giant leg around back and forth to the necessary rooms in the building :)

Wednesday, October 31, 2012

No Tricks and A Nice Treat

As an adult, Halloween is pretty much an non-existent holiday.  At least when you are in Prosthetic school.  There were no costumes, no candy and thankfully, not a lot of tricks today.  I did wear black pants and an orange (more like copper) sweater and fun Halloween socks to get into the spirit.

My treat of that day was that I was able to get Norma up in my leg and walking fairly well.  I say fairly well because she is 75 years old and I think that has to be taken into account when judging her on her walking skills in general.  She does not walk with perfect gait in her current prosthesis and she uses a roller walker to get around...so, getting her walking in the parallel bars perfectly is an unattainable goal. I was very pleased to get her up in the socket and feeling comfortable and walking back and forth with no issues.  She is not one for a lot of fuss and readjusting so I was lucky enough to get it pretty close on the first couple of tries.  I had to make some minor adjustments in height and trim lines, but as far as the socket (the most important part of these trans femoral legs), she said it felt really good.  She was not crazy about the knee or foot that I had attached to the leg, but to be honest, we were not really given a lot of options and I am not that crazy about the knee or foot that I attached either.

Tomorrow is a full day of critique - I am actually looking forward to it because I feel as though I know very little about trans femoral gait and I really need the exposure to seeing 18 different legs walking back and forth to help me learn.  I am up first in the presentations which also makes the day easier - I can get mine over with and then be able to focus the rest of the day on analyzing gait.

The last two weeks have been moving at a slower pace at school (because we started a new topic), but the schedule next week looks like we are back to running at full speed.  Casting and leg making and critiquing all in a matter of days again.  It is hard to say which pace I prefer - getting to leave earlier than 5:00 every day is pretty nice and the stress level is way down, but the days tend to fly by much quicker when we are under the pressure of a much smaller time window.  I am sure by this time next week, I will have decided for sure that I prefer to slower pace :)

Sunday, October 28, 2012

Move and Be Moved (CAF Weekend Part 2)


7am...drizzling rain, cool temps and a beautiful backdrop for the start to the CAF triathlon.  Although we were exhausted (which I know sounds terrible considering we are sitting here staring at triathletes beginning their race), we managed to haul ourselves up and out of bed to get down to the start of the swim.  I am SO glad that we did.  I have heard from people that this is one of the most amazing sights to see and they were dead on.

The first round of athletes to go out in the water are the challenged athletes.  The most inspiring round to watch for sure.  I have never attempted a mile swim in the ocean, but I know that it cannot be easy and to see these men and women get carried into the ocean because they are missing one or two or even three limbs and start swimming against these waves...it is impossible not to feel emotional.  It was just a swell of pride about the human race in general.  It was so exciting to see people pushing themselves, going beyond what physical limitations might have been set upon them and accomplishing this giant athletic feat.  There were hundreds of people watching the swimmers get ready and it is almost impossible to set the scene...giant crowds gathered around, overlooking the bluff, still and silent.  The sun just trying to peak through the clouds - giving us some relief from the constant nagging rain and the cold wind.  A calm giant ocean and a beach full of wetsuits and pink swim capped heads all stretching and rolling about in the sand and water...anxiously awaiting their signal to start.

My favorite part about getting the chance to watch the pre-race happenings on the beach was watching the camaraderie between the athletes.  They are all competing against each other, but at the same time are all competing on the same team.  I love to watch them encourage each other, push each other into the water, carry a friend in with them.  As humans, we are naturally drawn to those who have similar situations to us and the bond that these athletes share is unmistakable and quite an honor to observe.  The crowds were gathering and more volunteers and athletes were making their way down to the beach to get started.  The rain had stopped momentarily and everyone was buzzing with excitement - these guys just wanted to get into that ocean and get going!!  Everyone was hopping (quite literally) with energy and it was impossible to not get caught up in the feeling.  I could not wait for them to get started either!!


And, oh my, what a sight it was when they blew the horn to begin.  Everyone in the water, everyone swimming and my eyes were teary and my heart was full.  What an incredible thing to witness...I know that I am not doing it justice, but I hope you are able to get a small sense of what a beautiful morning this was.

And it was a surprisingly short amount of time before the first group was swimming back and exiting the water.  The first person out of the water was a woman who had competed in and won many Ironman competitions.  The first challenged athlete (and second person) out of the water was a man named Rudy Garcia...a bi-lateral amputee who just brought home medals for swimming in the Paralympics.  Watching them going into the water was pretty amazing, but watching them come out....now that makes your heart stop.  The volunteers typically rush over to help the challenged athletes out of the water, but 9 out of 10 of them refused the help and just scooted or hopped along the sand themselves...then of course they used their arms to get all the way up a long flight of stairs and tag their team member to start off the bike portion of the race.

We did not see much of the bike or running portions of the race - they all started in the same place and then took off all over San Diego.  We did see people cross the finish line later in the day and it was just as exciting as you can imagine.  What a sense of accomplishment for these competitors.

The fight in these athletes, the will to prove the world wrong, to prove something to themselves, to go against all odds...it is inspiring.  The CAF had t-shirts at the triathlon that said 'Move and Be Moved' and there are not four better words to sum up the experience and feelings that I had over the weekend.  This is an event that I know I will attend in the future (I don't know that I will ever participate in the 'move' part of the event), but I know I will be at the starting point for the swim...and I know I will continue to be moved.

*For more pictures from the entire weekend, you can go to the CAF Flickr Page:

http://www.flickr.com/photos/challengedathletes/sets/72157631838442293/#2012SanDiegoTriathlonChallengePhotos

And the Ossur Flickr Page:

http://www.flickr.com/photos/ossurcorp/sets/72157631860249081/

Thursday, October 25, 2012

Knees and Toes, Knees and Toes

I have officially completed my first "full" leg!!  In transtibial we were just attaching the pylons and the feet, but in transfemoral, we learned how to put a knee in between all of that!  Pretty exciting!!  I think I have mentioned this in regards to every single component or option that we have when we make legs, but the number of knee options is unreal.  There are knees that are called single-axis that simply act like a door hinge, there are polycentric knees (meaning they move all around), hydraulic knees and microprocessors knees...it is a lot to handle.  Thankfully, this is school, a place where you are given instructions and direction.  On our first project, we are all using single-axis knees.  All I have to worry about is this knee bending back and forth like a door opening and closing.  Well, first I have to worry that my patient will be able to walk comfortably enough in the leg to make that motion happen, but I am just assuming we will get there :)

The alignment process for transfemoral is a lot less stressful than that of transtibial legs.  This took me forever in previous legs and the measurements for transfemoral are all pretty universal and because you are controlling a knee and ankle and foot, you have a lot more freedom to move the alignment around once it is on the patient.  Transtibial is all about the alignment, transfemoral is all about the socket fit.

This week has magically worked out for me in regards to this prosthesis.  I know that it means I will probably struggle with the next project, but I am enjoying the calmness at the moment.  I was able to get all of my components together and attach them and "gunk" them onto my socket in a relatively quick fashion.  It is always such a cool feeling to look at a leg that you have completed from start to finish (I know this is redundant, but just looking at the picture makes me feel proud).  I will not get to try this on Norma until next Wednesday.  We are moving slowly through transfemoral, getting our feet wet and trying to learn as much as possible about the components and gait and alignment before we actually have to put the knowledge in action with our patients.  So, alas, now my leg just sits on my workbench waiting to be worn and walked in.  I have put all of my body weight on it, walked it up and down the halls of school (the knee successfully bending as it is supposed to) and cleaned it about 5 times since completion.  I guess the only thing to do now is to wait...


Tuesday, October 23, 2012

Earning My Own Trust

I mentioned a few posts ago that we have been taught to either trust our cast or trust our measurements and that I did not think I was at a point where I knew which one to trust (or if to trust one at all).  Today I learned that I should start trusting myself!!  This week it was trusting my measurements over my cast.  My patient, Norma, has a very "fleshy" limb with a lot of residual skin and tissue - this means my cast came out looking a little deformed...much harder to trust that shape.  My measurements, however, were dead on.  I spent the 9 hours last Thursday using those measurements to modify and honestly, I was a bit worried that Norma was not even going to fit into the socket.  Looking at my cast, it seemed as though the socket I made was going to be too small.  According to my measurements, it was going to be a perfect fit.

Thank goodness I trusted my measurements on this one!!  I went into this morning's fitting highly anticipating not being able to get Norma into the socket and prepared to do hours of modification in order to make a socket that worked...color me shocked when it went on perfectly the first time!!  I had to fix a few areas (lower some of the brims and trim up the wall in the back), but these were pretty minor.  I will take using a torch or a heat gun and a little more grinding any day over having to pour another plaster mold to modify again.

Norma said my socket was really comfortable (and as you may have deducted from the previous post about her, she is a tough cookie to please) and she stood in it for quite a while today.  It felt really great to have such a big success on my first trans femoral socket (it would feel great on any project) and I was high-fiving myself all morning about it.  This could mean that the next socket goes horribly wrong, but hopefully not :)

Because I did not have to re-pour and re-modify and re-pull another socket, I was able to take the afternoon off school!!  Three hours of freedom to run errands...the rewards of successful suction and total contact.

We do not see our patients again until next week - that is when we will be getting them up and walking on these legs - we will be attaching all of the knee and feet components tomorrow.  I am just keeping my fingers crossed that next week's walking goes as well as today's fitting, but for now, I am taking one victory at a time...this was a nice one.

*Part 2 of CAF Weekend still to come...

Monday, October 22, 2012

Redefining Ability (CAF Weekend Part 1)

My apologies for lack of posting the past few days - I was drowning in modifications and then I went to San Diego for the 19th Annual Challenged Athletes Foundation Triathlon.  This is the the first event since camp this summer that I have had a chance to do some volunteer work and get involved in the amputee community...I had been really looking forward to it!  This blog will be a two-parter because there were so many amazing things happening that each day (Saturday and Sunday) deserve their own post.

Friday night we had a meet and greet dinner - a kick off to the CAF weekend activities.  There were tons of people and it was fun to meet all of these names in the industry that I have been hearing about for so long.  There was also an awards presentation with inspiring and heartwarming videos and speeches.  Just another one of those times I get to sit back and be thankful I have found a career that really touches peoples lives.

Saturday morning I was up bright and early for the CAF/Ossur Mobility Running Clinic.  This clinic is put on for people with amputations, of all ages, who are interested in learning to run for the first time or improve their running technique.  Bob Gailey, the master of all things gait related to amputees, runs the clinic and he is just fun to watch.  He has the energy, the knowledge and the passion to inspire these people to get out and run and give them the confidence to know that they can.  There were about 100 participants - from age 2 to 70.  It is hard to even describe what it is like to watch a field full of running legs doing marching drills and running back and forth.


I, of course, chose to work with the children who attended the clinic.  The difference between adults learning to run and children learning to run is that children already instinctively know how to run.  And that have a very, very hard time being told to not do so.  The goal was to teach correct running gait and this means doing it in various steps, working up to running, but many of the kids just kept wanting to take off down the field.

Case in point :)  The little guy in red was all over the place all day...the most energy and just loving getting to run around with no abandon.  
This was my kiddo and partner for the clinic...is she not adorable??  I got to spend 3 hours holding her hands and helping her march down the field and take long strides and shuffle sideways and kick a soccer ball.  This was her 4th year attending the clinic so she knew way more than me!  
One of the drills was to have the kids march like soldiers down the field, saluting with the opposite hand per the leg that was taking the marching step.  (This is much tougher than it sounds, regardless of how many legs you have!!)  They were all very good listeners and I am always amazed when you can get a group of children to do anything all at the same time, so I had to capture it on film!
Let me introduce you to Cody.  He is one of the CAF sponsor children (on all of their posters) and is faster than you can possibly imagine.  He is not even 4 years old yet and he was zooming down the field faster than most adults at the clinic.  They might have to invent a faster running leg just to keep up with this guy!!
At the end of the clinic, there was an obstacle course and a giant relay race for all of the participants.  Everyone was divided into two teams and it was all split up evenly with both children and adults on each team.  Then two giant teams, about 50 people each, went through the obstacle course, tagging each other back and forth for the next relay person.  Cody was our lead guy on our team and Blake Leeper (Paralympic medalist from this year) was our anchor man.  It was a little tough to say who won (I think they kept it a politically correct tie), but it was definitely a lot of fun.


Another girl that I got close to at the clinic is an amazing young lady, Haven.  She was awarded the most inspiring/promising child of the year (something along those lines) at the CAF awards dinner on Friday night...and when I saw her in her tutu and sequined Converse sneakers, I knew we had to meet at some point this weekend.  Her background - that she was born in Vietnam, got caught in a bomb explosion where she lost both of her legs, and was adopted by a family in America.  She is tenacious and a crowd pleaser, she is smart and funny and has a very infectious smile.  It is impossible to not hear her story, see her run and be inspired.  And to also be thankful.  This clinic was about redefining abilities for these athletes...for me, it also helped continue to shape my perspective and reenergize me.  I have 9 more weeks of school and weekends like this make sitting through all those lectures and coming home covered in plaster totally worth it.  It was cold, it was rainy, but it was life changing and I am already looking forward to going back next year and continuing to watch the abilities of these athletes grow.